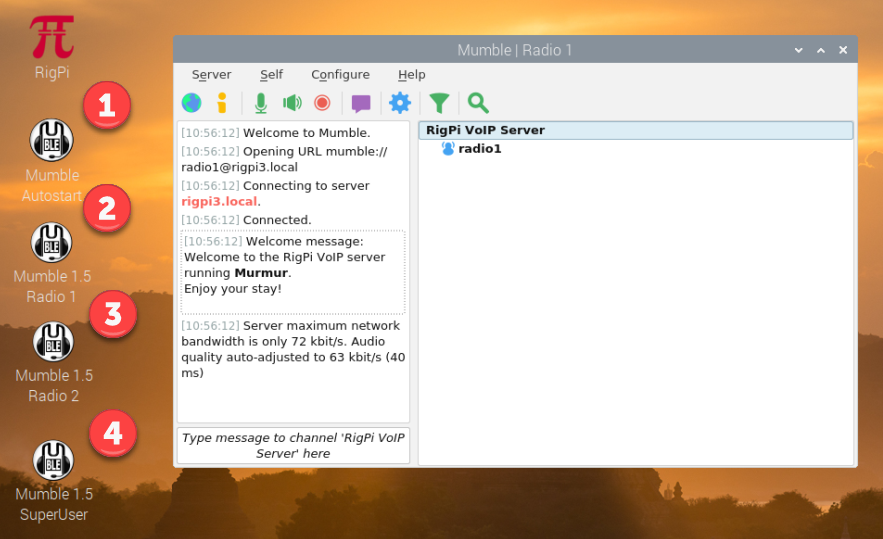
Mumble is an open source VoIP system. A VoIP server called Murmur is installed on RSS along with a Mumble client. The MFJ RigPi Audio board normally provides an input and output path for this Mumble client, although USB audio sound devices or radio CODECs can also be used. One radio can be connected to the Mumble client. Remote Mumble clients can also connect to the server and receive and send audio. Free Mumble clients are available for all popular operating systems.
The Murmur Server is named RigPi VoIP Server and the configured Mumble Client is named Radio1. Mumble can be started manually from the RSS Desktop by selecting Radio 1. A utility named Autostart is on RSS Desktop. Run Mumble Autostart to have Mumble start automatically when RSS is rebooted.
A second instance of Mumble can be started using Radio 2. Radio 2 uses its own audio device or radio CODECs.
The Mumble SuperUser account is used to change advanced settings. The SuperUser account has access to settings not available for normal accounts, but does not process audio.
When you start Mumble the Mumble window opens on RSS:
Mumble Settings
If you make any changes to Mumble settings, click Apply at the bottom of the settings window to test. When you are satisfied, click OK. Close Mumble before rebooting RigPi or else you will see an error message when restarting.
Mumble uses RigPi Audio for input and output audio, audio USB dongles, or CODEC's from your radio.
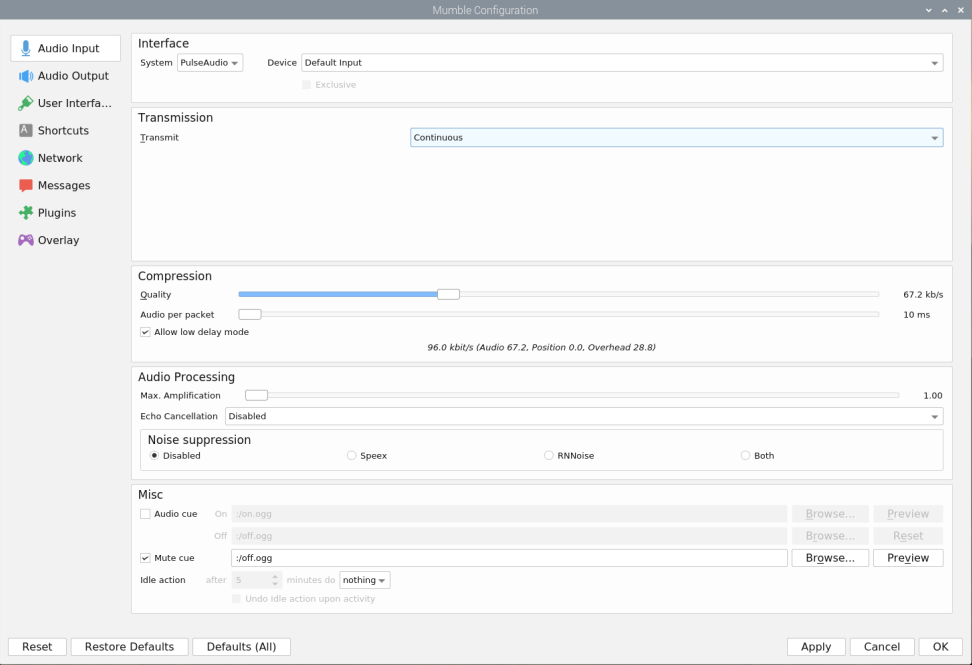
Refer to Mumble Help for setting up Mumble. One setting that applies to Mumble in RSS is found in the Audio Processing group of Mumble Configure>Settings>Audio Input. Set the Audio Processing to Disabled. If Noise Suppression is enabled the normal background noise on HF can cause distortion and clicking in the audio output. (See screen shot below.)
Mumble Clients can send audio continuously, by use of a Mumble PTT key, or by detecting voice activity (VOX). The screen shots below are shown below to include all audio in and audio out settings. The settings shown are typical. You will have to adjust them to maximize audio quality with your RigPi.
In Mumble Configure>Settings>Network enable the 'Reconnect automatically' and 'Reconnect to last server on startup' options.
Audio Input
System (MFJ RigPi audio board): Select ALSA from the System drop-down list. In Device, [hw: CARD=sndrpiproto, DEV=0] snd_rpi_proto, WM8731 HiFi wm8731-hifi-0 Direct hardware device without any conversion.
System (Radio CODEC): Select the Microphone and Speaker CODEC settings in the Desktop Menu bar. Select PulseAudio from the System drop-down list. In Device, select Default Device.
Transmit: This lets you change what causes audio from your radio to be sent. "Continuous" is recommended, but you can also have Mumble attempt to transmit only when there is active audio from your remote device. Voice Activity is useful to show an audio level bar graph which can help when finding the correct settings.
Audio Cue: This causes a sound to play whenever you press or release the Push-To-Talk key. Not active when Continuous Transmission is selected.
Quality: This is the quality at which Mumble will encode audio from your radio. It is recommended that you leave this at 40.0 KB/s. However, if the audio sounds distorted, you can try raising or lowering this value.
Audio per packet: This is the amount of audio that Mumble sends at a time. A lower value means less latency, but might potentially introduce quality loss, if too low. I recommend that you leave this at 20 ms.
Noise Suppression: Mumble can automatically filter out static background noise. When set to Speex, RNNoise or Both, a slider adjusts how aggressively noise is filtered. If filtering is too aggressive, then your voice may become distorted. Leave Noise Suppression Disabled to remove all noise suppression.
Max. Amplification: This setting controls how loud the receive audio is.
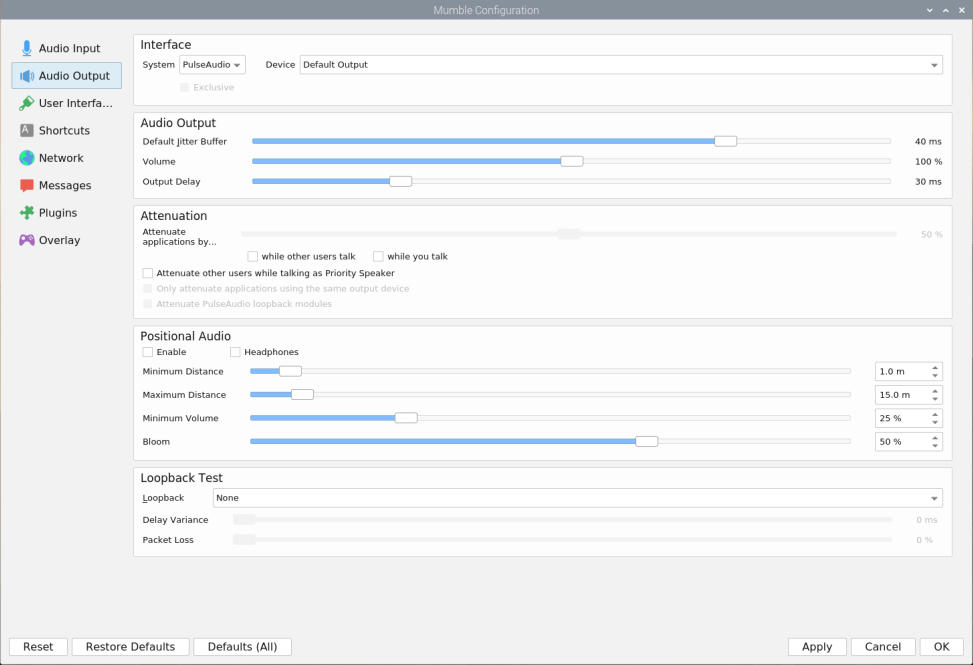
Audio Output
System (RigPi audio board): Select ALSA from the System drop-down list. In Device, select [hw: CARD=sndrpiproto, DEV=0] snd_rpi_proto, WM8731 HiFi wm8731-hifi-0 Direct hardware device without any conversion.
System (Radio CODEC): Select PortAudio from the System drop-down. In Device, select Default.
Default Jitter Buffer: If your mic audio is distorted, metallic, or sounds like a robot, try increasing this setting a notch or two.
Volume: Output volume. The volume setting for audio sent to the radio's mic/audio input.
Output Delay: If your transmit audio is distorted or is breaking up, try increasing this value.
Attenuate applications by...: This setting determines how much Mumble will reduce other applications' volume when people talk. A setting of 100% means to mute other applications; 0% means do not do anything to other applications. Additionally, you can select to attenuate when others talk, and/or when you talk with the "while other users talk" and "when you talk" check boxes.
Loop back: This is a super handy feature for troubleshooting problems with your transmit audio settings. You can set Mumble to "loop back" to you, so you hear what you are saying the way other people will hear you. When troubleshooting, try setting this to "Server", and then tweak options in Audio Input and Audio Output to get your audio sounding just right. Remember to set it back to "None" after you're finished, or else nobody will be able to hear you
Managing Accounts
If you wish to remove clients that have been registered, use the SuperUser account. The SuperUser can delete registered accounts.
Using a Remote Server
RSS is can use an external Mumur server. If RSS is connected to the Internet and you expect to have a large number of users, a remote Murmur server may be attractive. In addition, port forwarding is not required when using a remote Mumble server, making the connection easier to accomplish.
Murmur servers are available for free or low cost. Commercial server companies typically charge based on the number of "slots" you want to use. A slot is a unique user logged in to the server. Server fees typically run less that $2 per month per slot. Details for connecting to a remote server are beyond the scope of this manual, but instructions are usually given on the server you choose.
One commercial Mumble service is mumble.com. Up to a 50% discount is available if you commit to more than one year. mumble.com also provides a way to connect through a web browser rather than a Mumble c4043lient. This can be done by using the URL https://<your account>.mumble.com:4043
Running more than one Mumble client
Using the Radio2 client makes it possible to simultaneously run audio from more than one radio through RSS.
There are two requirements.
1.You need one (or more) audio IO devices in addition to RigPi Audio. This can be done with a USB audio dongle. For my tests I used a Griffin dongle, but any inexpensive USB/Audio device should work well.
2.The second Mumble client is started with parameters -m and -n.

Now you can log in. Radio2 is used as the username. With two clients you see both users in the client lists, radio1 and radio2. The user connected with its primary client is shown in bold. Assign the audio dongle to the second client. Now you can connect the audio to/from two rigs.
Since all users hear all other users, you will hear audio from both radios. That has interesting possibilities, such as monitoring 2 repeaters at once. You may want to control the audio from the two radios separately using macros. Sample macros for muting USB and analog audio levels are provided in macro bank 2.
Install Bonjour
The Mumble server requires that Bonjour be installed on your computer for clients to connect. If you are using a Windows computer, follow the instructions here. Bonjour is included on Mac computers.